Sunday, June 27, 2010

Student Work: Lisiane D'Amico


Renderring by student Lisiane D'Amico

I often receive resumes and portfolio's from design student's looking for internship placement or employment opportunities.  Even though I can't hire them all, I'm always impressed at the quality of work being done at the student level - it seems to just get better and better.  A result of new technologies and all the wonderful illustration capabilities of programs like Photoshop, AutoCad and Sketchup which make their projects's look so professional.  Also I think the ability to source product, material and research on the internet has provided them with a wealth of resources at their fingertips.  Not to mention, having access to online trade magazines and website portfolios and blogs of the world's best designers - none of this existed when I was a design student.

In Ontario recent changes to regulations in the Interior Design industry associations has resulted in all accredited school programs becoming 4 year degree programs instead of 3 year diploma programs or 4 year degree programs.   Following the 4 year degree, an additional 3 year internship is required prior to being able to write the NCIDQ exams, and allowing registered status at the provincial association level.    Knowing first hand the skills and knowledge that's acquired thru all these years of school and hands-on work experience, it truly amazes me when I regularly hear of people who decided to become an 'interior designer', just like that, with no formal training or related work experience.  But the problem is the profession of Interior Design is often misrepresented and confused with the practice of Interior Decorating particularly as it relates to the field of residential design.  But that's a whole 'nother topic of heated discussion that I'm not going to get into here!  

Unfortunately even many students who decide to enroll in post secondary interior design programs are not quite prepared for what a career in this field involves,,,,,and there's a high ratio of drop-outs after the first year.  In my own class, we went from 30+ to less than 12 at graduation.

Most graduates of Interior Design programs go on to work in fields not related to residential, the majority of graduates go on to specialize in Healthcare, Hospitality, Corporate or Retail environments which is where most of the jobs are whether its with small local firms or large international companies like HOK.  Its rare actually that design students focus on residential design during their 3 or 4 year program and in fact the instructors discourage students from this so they can create a diverse portfolio to take with them into the workforce.

So instead of archiving all these wonderful student portfolio's that I receive, I thought I'd share some of my favorite student projects here.  The first student is Lisiane D'Amico, she's a graduate of Ryerson's Architectural Sciences program and has gone on to pursue her passsion for interior design where she feels she could explore the more creative side of architecture.  She's currently a 2nd year student at Sheridan College's Interior Design program, I first met her thru this blog and invited her to send me samples of some of her work.  I've chosen what was her first residential project at Sheridan, the Campbell-Harding Residence which she describes as "Modern-Mission".


Ground Floor Plan
For the assingment, Lisiane was provided a complete client profile (bio) including all their design requirements along with a base plan of a house.  She was required to design all the interior partitions, select all the material finishes, design the lighting and electrical layouts and select all the furnishings and fixtures.  The project was to be designed in a style that blended both owners love for modern and mission design styles.
For Lisiane's first ever attempt at a residential plan, I think the layout works well and she's paid great attention to sight lines and maximized window locations.  If she were working on this project in my office I'd suggest exploring a U-shaped kitchen layout as an option to the small island and I'd like to alleviate some of the door traffic at the bottom of the stairs.


Second Floor Plan
The most challenging aspect of any project is the partition layout,, particularly figuring out where to put the stairs because they dictate how both floors will flow.  It can take years of experience and even personal experience to understand how the location of walls and doors will effect the flow and efficiency of a house.  On the second floor here my only observation again is the congestion of doors at the top of the stairs, and if she were working on this in my office, I might suggest simply reversing the stair direction, up is down, down is up and see how that develops.
When working with residential clients we design things very specific or particular to that client's wants, even if we don't think its the best solution,,,with commercial design its more about designing for the masses, its all about universal design, averages, typicals, and social behaviours.  In the master bedroom, this is an area that could be designed dozens of different ways and work equally well depending on that particular homeowners lifestyle.  In my experience, I find that putting the closet and the dressing area next to each other works best for most clients, so in this case I would also present an option to the client that places both the walkin closet and ensuite on the right side keeping the bedroom area on the left.  This keeps your dressing and grooming areas side by side without having to walk from one side of the bedroom to another.


Elevations
I think her furniture selections, millwork and cabinetry detailing is fantastic!


I love the photogallery on the tall staircase wall!  This was one of Lisiane favorite elements too.
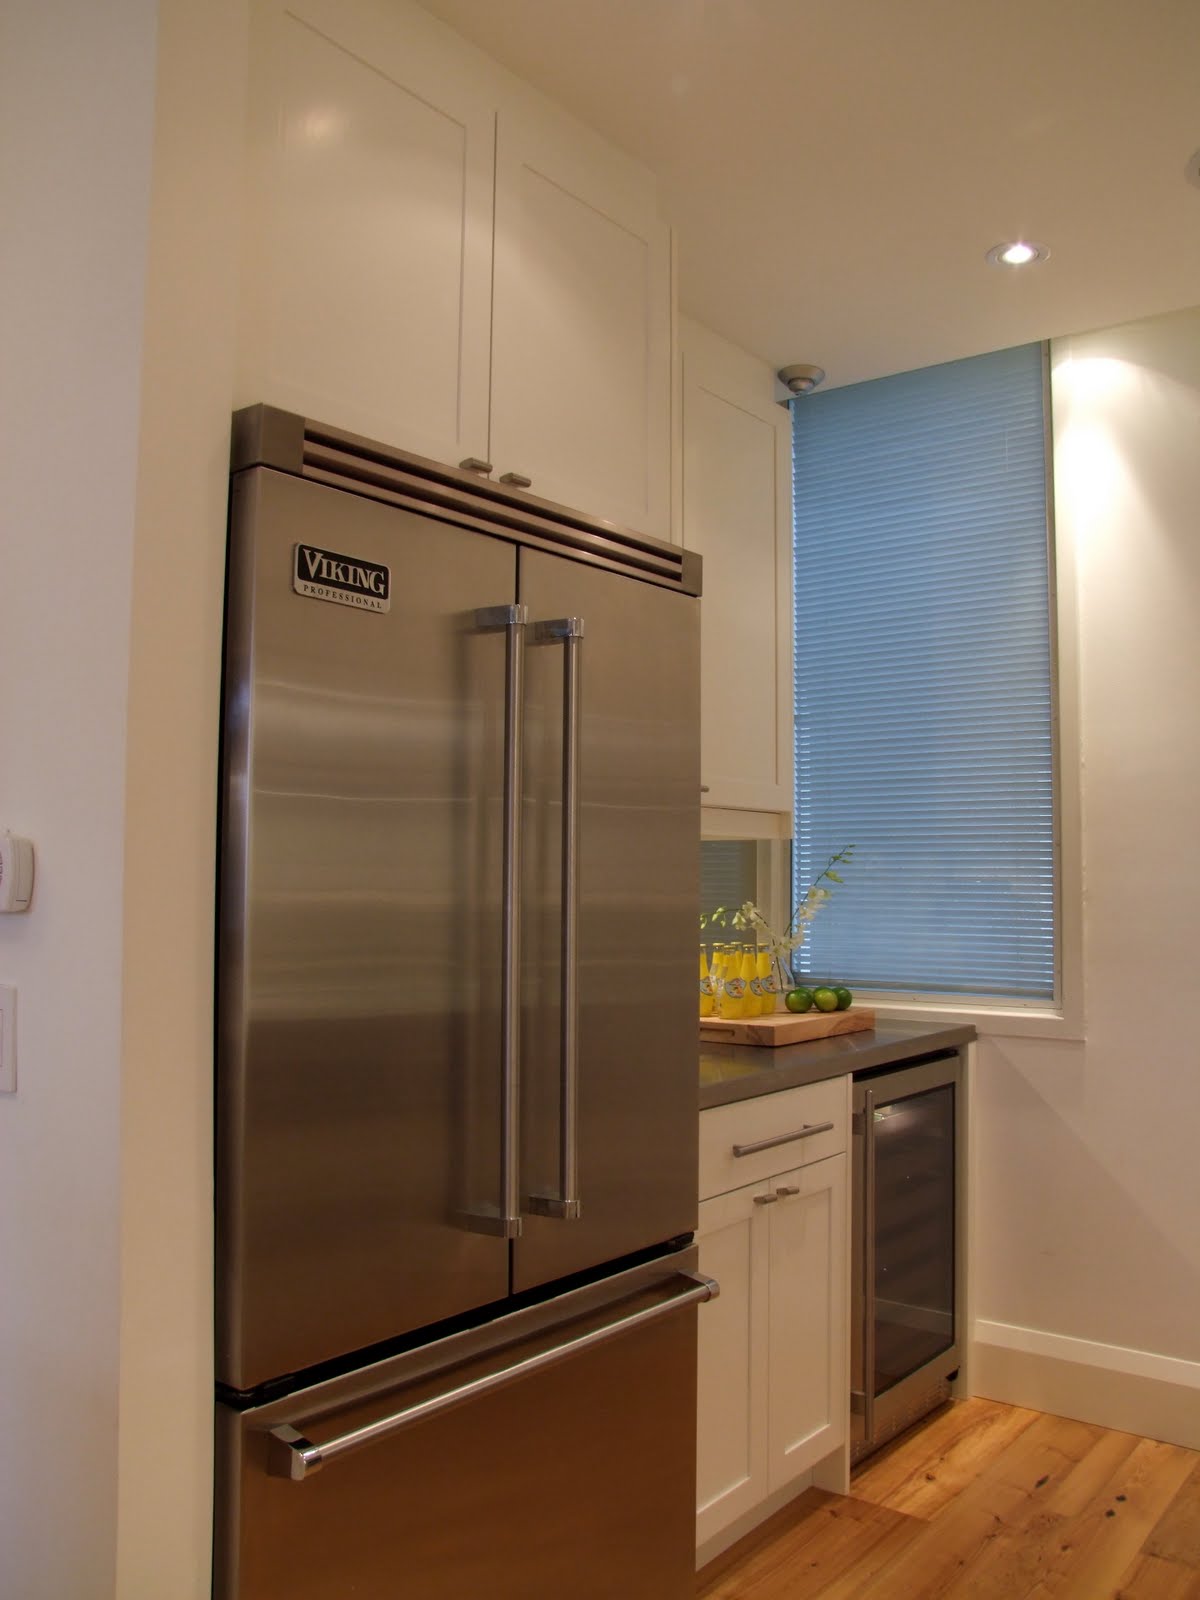

The Kitchen
I think her kitchen detailing and material selections are excellent too, I love a sink under a window!

Sample Board
Sample boards for concept presentation purposes are tricky.  They can be totally misleading if the materials aren't visually represented in correct proportion to how they'll be used in the space and its difficult for most people to visualize how colour or fabrics will actually really read in application.  In this case, I think Lisiane's done a wonderful job in not only selecting the materials and furnishings but in presenting them on a board.  I can see with the mix of dark woods and contrasting light materials this is a modern interpretation.


Boards like this take an enormous amount of time to prepare, in real life I used to do hundreds of these when I worked with commercial clients but for residential,,,,,,not so much.  Truthfully if your presenting concepts or options to clients there's no point in gluing this stuff down because it'll be deleted or changed before the glue has time to dry, and once things have been approved and agreed upon, then there's not much point in pasting it all on a board, it simply not a good use of time.  I make a simple site board with materials on it and file the rest away in the project binder.  But students are required to do these so they can present their project to the class - just like in commercial projects designers have to present to a committe or board.

The most interesting part of this project requirement for me was that the students weren't given a budget to work with.  I think that's so unfortunate because that really is the key variable that drives the decision making process and what drives innovation throughout a project.  A huge part of defining whether a design solution is successful or not is how the designer utilized the budget. 


I had the opportunity to discuss with Lisiane what she was looking forward to focusing on in the upcoming school year  and I think she nailed two of the biggest issues I've always felt have been ignored at the classroom level - budgets and business.  Its critical that students learn how to work with a budget and learn the business side of the profession as these are pivitol aspects to success.   Next year she's required to do a two week student placement so if any designers out there are interesting in having Lisiane work with you for a couple of weeks you can email her at lisiane.damico@me.com.

Thanks so much Lisiane for sharing your project with me - your presentation and renderring skills are outstanding and I look forward to posting another one of your projects soon.

If you're a student and have a project you think I'd like  -  email it to me and I might feature it here!


Tuesday, June 22, 2010

Upload: June 22, 2010


Fresh white peonies and some fireplace renderrings in my studio


Well its been 3 weeks since my last Upload here.....which coincided with the peak of peony season around my house,,,,,and that lasted all of about 1 week this year.   They bloomed faster than I could cut them and then a few days of hard rain destroyed anything that was left on the bushes.  Such a shame I just wanted to cry,,,,,,um, actually I think I did.  So then, picking up here where I left off you'll see the last of my peony photos for this year! : (  


I was stacking the peonies wherever I could find a spot.  


I was like the Peony Express,,,I was taking them to friends and clients!


If you remember my last upload post you'll remember a vintage dresser I found at the Aberfoyle antique market, I delivered it to my clients and had her handyman hang the mirror above.


The mirror was purchased a couple of months ago and was waiting for the dresser, it was nice to finally get these pieces in place.  The dresser was perfect for this spot,,it was only 18" deep and had 5 drawers.
Mirror is from HomeDepot, flowers are from Chapters. All it needs is a couple more accessories  (Doors, floor and wall colour were all pre-existing when I came on board, and all had to stay as is).


It is possible to find some really cool fixtures for not a lot of money.


I can't help it, there are usually about 2 or 3 shots like this a day - Iphone is so touchy!
Now off to source some items for a rooftop deck...


Making fabric selections for new outdoor furniture


We're thinking about these for the rooftop deck too,,,,the large size


A lighting option for end tables..


A modern outdoor light fixture option....


This one isn't the one for this project but I love the pattern this fixture throws off, dramatic!


I sat down last week for a long chat with one of the owners of a new furniture store coming to the Caledonia & Castlefield design district.  He sketched out the floor plan floor for the new showroom and has shown me tons of photos of the product they'll be selling.  I've been hearing all about the progress of this new store for months now so it'll be intersting to see it evolve.  It's called Shelter Furniture, you can check out their facebook page here for a sneak peek of what's to come.
One of my favorite pieces soon to be available at Shelter Furniture


Before photo: I'm currently designing a new island for this client's kitchen, but were not stopping there, the entire kitchen is going to get a complete modern facelift.  Oh and the floor,,,that's going too!


And in my spare time (!?),,,,,I'm helping a family member finish his kitchen reno.  He needs cabinets stat, so I helped him get that all sorted out.  See drawings taped to hood!


I've been searching for a certain pair of night tables for about 5 months now,,,the search continues.


At first i like these lamps (almost love them) but I hesitate, I know if I start to see them en masse, I'll hate them.  But oh how I love a black shade!


Entrance to Gail's Kitchen, in the midst of construction as I arrived for a site meeting last week.


Things are moving along, framing, electrical and plumbing inspections have been passed and the drywall went up last week.  This is the view from the family room up into the kitchen.


I tweeted last week that if no one bought this chair, I would.  But it wouldn't fit in my car and I don't currently have my own mod patio for it, or a client for it.  My basement is already full of chairs.  I envision it spray painted with a new fabulous cushion and a funky side table.  C'mon,,,its only $95, I can't believe no one's bought it yet!!!


I may need to rent a storage locker soon.  I spotted this set of nesting tables outside an antique store in Oakville and I can't stop thinking about them.  I wish I had a client for these, I'm crazy for them.  This is the type of thing that takes a room to the next level.  When you have a room full of new furniture, you need to add something like this.  Its the unexpected thing you can't ever plan on finding or imagine you'd ever buy but once you see it in place it makes the room.  I can envision this even though its on the sidewalk and believe me, it would be stunning!  Look at the tourquoise detail......


And this chair,,,,,yes it needs some new fabric but this,,is the quintessential accent chair and it would make quite a statement in any space.  Love it.


I'm so influenced by the weather, my moods and my appetite.  I love the rain, I always have.  We've had a lot of it lately and the other day it was the strangest of days, it was a mix of both brilliant sunshine and torrential downpours.  Rubber boots and Ray-bans, I think those are the best kind of rainy days....


All Photos:  Carol's Iphone


Sunday, June 20, 2010

My Father's Daughter


Snow globe of me and my dad

On father’s day I always think about how I was never a Daddy’s girl.  I was the 5th born of 6th kids ........and the first and only girl, yes, the only girl of 6 kids!   Obviously everyone thinks my parents were trying for a girl and the 6th child was,,well, he was just an accident.  But I don’t think my father was trying for a girl at all I think he was trying for the ultimate hockey line.  I think he was disappointed I wasn’t a boy.  Its true, the 6th child really was an accident ; ) but conveniently he made an excellent goalie!!  Until he came along I was the ‘stand in’ goalie,,,from the moment I could stand my brothers strapped boys skates on my feet and planted me in front of the net while they took shots at me (on our ice rink in the backyard).  That’s kinda like what the rest of my childhood was like!  Instead of coming to my rescue my dad always thought it was amusing and took photos, pleading with me to stop crying - typical, he always took the boys side.  That pretty much sums up what it was like growing up as the princess among all those toads.

Everyone thinks I must have been spoiled rotten being the only girl, in fact I was anything but spoiled,,,,,,,I would say it was more like I was spared.  The boys would torment me to the edge then stop short of getting caught, oh they were sly that way.  Maybe they resented me because I had my own room, I’m sure that was it!?  Believe me, having a room of your own was a priviledge in a 1200sf 3 bedroom house.  Being the only girl made me an easy target for my brothers,,,,they have no mercy when it comes to sisters.  It was entertaining for them to see how quickly they could make me cry or how easily they could scare me or outrun me or outjump me or outshoot me or throw farther than me. So it became my goal in life to not let them see me cry and to try and keep up with them,,,not only did I want to do everything the boys did,,,I wanted to do it better.  Sure I could ice skate, slolem ski, drive a speed boat, dive off the big rock, swim across the bay, catch a line drive, and a 16 lb pike, drive a golf ball 300 yards, and that was all before..........I discovered power tools. : )

My dad never hired a repair man or a tradesman in his entire life.  If it was broken he fixed it,,,,if it was beyond repair he made a new one,,,as a rule he wouldn’t buy anything he could make himself.  And he would never ever ever,,,,ever throw anything out, especially a piece of wood - a child born of the depression era.  Old hockey sticks were prime lumber,,,,I’m sure he could have written a book on the things you could make with old hockey sticks!  Til this day my parents first colour tv cabinet still sits in my moms living room - the tv was encased in a wood cabinet so even when the tv tube was shot my dad continued to use the cabinet to house all his future tv’s - it was perfectly good wood afterall.  I even remember him re-painting his own car,,,,,,,with a brush!!!!  I remember the endless home repair projects because I was always my dad’s helper,,,,,I would stand by watching him work on various projects and hand him the tools or ‘hold’ things that needed holding. He owned every tool and gadget you can imagine, our garage was like a rent-all store, if you needed a tool, Howard had it.  There was always a stream of neighbours and relatives showing up to borrow tools (he kept a log!) and the phone was constantly ringing with requests for a helping hand for a repair project.  My dad was the go to guy if you needed help with fixing something.

My father was a master Mr. fixit, a genious DIY’er and the pioneer of reuse and recycle, he repurposed everything and not because it was the 'green' thing to do.  He was innovative.  Before there was picture in picture,,,he stacked multiple tv’s side by side and watched them at the same time.  He put wheels on furniture long before mobile furniture was trendy, he was as savvy with a sewing machine as he was with power tools. He sewed his own slipcovers not because he was trying to be shabby chic.  He used the sewing machine to repair holes in our camping tents and to make new covers for cots and mattresses, and new seat cushions for chairs, I'm pretty sure he even sewed our own life jackets (?), kinda scary.  To everyone who knew him he was the one who could figure out how to fix anything and everything - and he always did.....except for his cancer.  That was the one thing he couldn’t fix, and no one else could either.  Sadly he lost that brief battle 3 years ago and we all miss him terribly.


Never throw out a piece of wood, it might come in handy (example above)
Why buy a birdhouse when you can make one (example above)
Birdhouse made by Dad from salvaged scrap wood on display in my moms garden.

Thanks to my dad, I have a pretty good collection of power tools myself and I’ve used all of them personally for many home improvements over the years, when I got married years ago and moved into my first home, my dad would give me a new power tool for every birthday and christmas.  I think it was his way of saying,,,,,,your going to need these a lot so you should learn to use them yourself.  And I’m so grateful I did.  Nowadays, I dont’ have much time to do projects around my own home myself but its a good feeling to know that when I ask my ‘handyman’ to do these things for me or if I hire someone to do it, I know its not because I can’t do it myself.

I inherited a lot of my dad's traits and its served me well in this profession - I’m inherently resourceful, technically intrigued, and I have this unending desire to ‘fix things’ to solve problems, to reuse or repurpose things, to figure out to how make something work better, or create something for less than what it would cost to buy it.  I know I definitely inherited the ‘why buy it when I can make it’ gene from him but sometimes it works to my detriment!  A civil engineer by profession, my dad was a superb draftsman, his hand printed schematic drawings were like works of art, beyond that he didn't exude much artistic flair - I was fortunate enough to inherit that gift from my grandmother (his mother) who was a stained glass artist.

I’m also thankful to Microsoft.  Really.  Because up until a couple of years before my dad died, I never felt like anything I did every really impressed my dad much,,,,,,until he decided to take some computer course and learn how to use a computer.   That’s when the proverbial tables changed and my 20+ years of computer use finally payed off.  The fact that I could easily navigate my way around an MS operating system with my eyes closed.... made me look like a true genious, I might as well of been Bill Gates in my father’s eyes.  He looked at me with pure awe and amazement as my fingers flew across the keyboard,,,with multiple windows open at a time, ‘fixing’ all of his problems, using shortcuts and showing him around the 'big wide web'.  He’d often call me with a computer question or problem,,,,,now that was sweeeet, talk about role reversal.  Something that was so easy to me,,so effortless and second nature was a mystery to him. Something my father didn’t know how to do that I did!  So if for nothing else but for my ability to use a PC he thought I was utterly brilliant. : )

I started this blog last year on the anniversary of my dad’s passing partly because I was always thinking about him and missed how he was always asking about what I was working on.  If my dad was still alive today I know without a doubt he would be the biggest fan of this blog,,,,,I guarantee he would faithfully log in every single day to see if there was a new posting, and if there was, I know he’d read every word out loud to my mom,,,,,then he would email his siblings and tell them there was a new post,,, then he would call me and rehash all the details in amazement at the extravagant costs and efforts of this or that,,and tell me what was on sale at Canadian Tire this week.  Of course first I’d have to walk him thru how to become a ‘follower’ and  how to leave comments.........because he would want to do that....   

Happy Father’s Day Dad,,,,I know you're following.

No.5

Sunday, June 13, 2010

Painting Ikea Kitchen Cabinets


Kitchen design by Carol Reed


When planning or dreaming of planning a new kitchen the key aesthetic decision to be made is what style will the cabinets be.  The first dilemma is deciding will they be a wood finish or painted?  Dark or light? Contemporary or traditional?  Whatever door style you chose to go with will have an impact on your budget too.  Wood doors are more expensive than painted (or lacquered), exotic woods more expensive than domestic, plain doors are less expensive than panelled doors etc. etc.  Your budget will determine whether you can afford to buy custom cabinets, semi-custom, or if you'll be purchasing non-custom stock cabinetry.  If you're going the non-custom off the shelf route (Ikea) then your options for door styles obviously are limited to what is offerred.  Ultimately, its the door style you chose that will dictate which mfg or supplier you end up going with.  If Ikea just doesn't offer a door style that appeals to you then you're less likely to go this route despite the huge cost savings.  

I'm not a fan of showy extravagant kitchens unless the kitchen really is just for show, (for those who eat out a lot or hire caterers) nor am I a fan of overly adorned cabinets with intricate mouldings, corbels, columns and doo dads.  My ideal kitchen are kitchens that have a utilitarian aspect them, its all about cooking tools, food, great light and above all comfort and efficiency, I prefer the lines to be simple and the materials natural.  I don't necessarily want the cabinets to be the focal point or the showstopper, I want them to evoke a mood and enforce a style which is part of a bigger picture, they're just one element.   In open style homes when your kitchen is exposed to your living and dining rooms its often appropriate to go for a bit more of discreet look with your appliances and tools more integrated and concealed, with separate kitchens the concept can be more relaxed and casual.  In either case the style of the kitchen cabinets should be consistent with the style of your decor and the character of your home.  For many of these reasons Ikea's range of door styles suit my needs for various projects because they offer some basic classic door styles. 

Chosing an Ikea Door Style
To me what makes an Ikea kitchen design successful is when no one can tell its an Ikea kitchen.  One of the keys to this is to pick a classic door style for the cabinets, by this I mean, stay away from the door styles that are unique to ikea.  If you stick to a plain slab style, shaker door or the simple raised panel door,,,these are more generic looking because they're door styles that you can find at most any kitchen company.  It won't be obvious its Ikea unless you tell people or unless there are lots of other ikea elements in the room.  If Ikea doesn't offer a door style in a colour that you want, then you have two options, you can order just the base cabinets from ikea and have custom doors made from a company like www.cabinetmart.com or you can have your Ikea doors painted to whatever colour you want.


Kitchen Design by Carol Reed

Professionally Painting your Ikea Cabinets
If your plan is to paint one of Ikea's door styles, then you should select one of their wood door options.  The white or coloured doors have a polyester coating on them which isn't conduscive to painting, you'll get a superior finish (adhesion) painting over wood.  As I mentioned in my post Why I Love Ikea Kitchens, my favtorite door styles to paint is the Tidaholm in solid oak because its a true shaker style door with square edges and solid wood joinery corners (unlike the Adel).  I've custom painted Ikea cabinets several times in the past and I'm currently going thru this process again for Gail's kitchen.  In the past I've done a custom finish applied on site (see photo above), which I wouldn't recommend to the average diy'er its time consuming and requires a skilled painter/faux finisher.  When I'm having a new Ikea kitchen painted for a client this is the process that I've developed for my own porjects and its works like a dream.  (Please note this is the process I follow to have cabinets professionally sprayed off site (shop finished) - cabinets can be painted on site by yourself or a hired painter but I'm not going to go into the 'how to's' of that here, you can google hundreds of sites for more information on that process.)


Painted Tidaholm cabinets.  Kitchen design by Carol Reed
('xcuse the not so attractive window, its part of the condo building's interior courtyard design, the blinds are between glass and common elements the unit owners can't change.)

The following steps assume you've arrived at a final kitchen layout and you're ready to proceed, your contractor or kitchen installer is already lined up...

Step 1:  Sample 
  • Colour test:  Go to the as is department and buy a small door (or two)  in the same style or styles your considering and use it to test paint colours on.  You can buy these for about $5.  If they don't have any, you can go to the kitchen department and order a single small size door in the style of your choice.  After you've painted up sample doors and confirmed you want these painted cabinets, you're ready to order.  But I warn you, be prepared for the onslaught of comments from parents, friends, neighbours, contractors and delivery guys about how crazy you would be for painting over such 'beautiful' brand new oak (!!!!!???), and be especially strong when they actually start to convince your husband they might be right - just envision what their kitchens look like, then its easier to ignore them.


Step 2 - Buying Your Cabinets
  • Split The Order:  This is the best tip I can give you.  When I sit down with the kitchen rep at the store I pull out my drawings and before they start entering the order I tell them I want to split the order in two.   I want one order to have all the base cabinets, drawers and any inbetween panels needed to install the basic base and wall cabinetry, and nothing else. On the second order, I want all of my doors, drawer fronts, toe kick, end panels, cover panels - basically all the exposed pieces that I need to have painted.  (Even though they illustrate complete cabinet assemblies in the catalogue and online, all the components are broken down at order entry and you can order the components individually ie; the drawer boxes are one item, the drawer fronts are a separate item.)
  • Timing: Splitting the order is also key to your schedule.  The Akurum base cabinety is typically instock and available same day or for delivery within 2 days (where I live).  But ALL WOOD doors and drawers fronts etc. are stocked in the Montreal distribution centre and aren't shipped to any store until orders are placed and this takes a min 2 weeks. 
  • Delivery:  Arrange for the order with all you base cabinetry to be delivered to site and the kitchen install can start immediately (assuming you're ready for the install).  The entire kitchen can be installed without the door fronts and trim pieces.  The benefit of this is you're shaving weeks off your schedule by not waiting for your doors and now once you have your base cabinetry instaleld you can even have your counters templated while your doors and end panels are being sprayed.  Your templater can factor in any end panels not yet installed.   Next arrange for pick up then delivery of the second order, all your door fronts etc., to go straight to your cabinet refinisher.  Of course you or your contractor have to let them know ahead of time that your order is coming. 


Step 3:  The Paint
  • Lacquer:  I have my cabinets sprayed (off-site in a shop) in a lacquer paint as opposed to having them sprayed with regular paint that's thinned out with water and sprayed on.  I believe the lacquer is more durable but I do admit paint products are changing by the day and I havn't tried all the newest and latest.  My Farrow & Ball rep swears their paint is just as durable and perfectly suitable for kitchen cabs, but I still use the lacquer.  You have to find a specialty paint store who mix lacquer paint, they can match any mfg's colour chips or anything else you bring them for reference.  You need to factor in a few days for this in your schedule, you can't walk in and pick this stuff up same day like regular paint, they need a few days.  You also want them to do a draw down for you so you can approve the paint match before they mix the 3 or 4+ gallons of lacquer.  In addition to the lacquer you'll need primer.
  • Melamine:  The same shop that will mix the lacquer for you will mix some melamine paint for you in the exact same colour as the lacquer.  The melamine is needed to paint anything on site that you can't have sprayed off site.  Or for touching up panels after the counters are installed.  For example, you may need to install full height end panels beside your fridge or your wall ovens in order to complete the base cabinetry install so if you didn't have those sent to the refinisher, they went to the job site and are still in the original colour.  These can be painted on-site in a horizontal position before installation for best results, or if needed, vertically after installed.  The melamine is self-priming and self-levelling (no brush marks) with a sheen level the same as the lacquer.  It dries to a beautiful smooth finish that looks like its shop applied.  Use a small veleur or foam roller to apply a min. of 2 coats in a dust free environment.  You can do these pieces yourself or have your painter do this for you.
  • Cost:  The lacquer is fairly expensive, it will cost about $3-400 for the lacquer and primer for an average size kitchen and the cost of spraying the white kitchen in these photos was about $900 for one coat primer 2 coats finish paint but I would use 3 coats if using a light colour.  I use ProGlo paints in Toronto and they supply the primer, the lacquer and the melamine and ship directly to my refinisher.
  • Timing:  The refinisher will require about 2 to 3 weeks to spray the cabinets.  Arrange to have your cabinet installer back to finish the install and install the hardware.
Note that the Tidaholm or other wood doors have an open wood grain surface, and once their painted you will still see the texture of the open wood grain.  Whether you like this effect or not, this is what you'll get, but I can tell you that once the doors are up you don't notice it at all. 

Here's another look at this kitchen I designed about a year and a half ago as it was nearing completion.  The cabinets are Ikea's Tidaholm, custom spray lacquered in Farrow & Balls' Pointing.  Sorry no final after photos just yet!  The gables between the cabinets and the full gables beside the wall ovens were painted on site.


Kitchen design by Carol Reed


I searched around for more photo examples of painted Ikea kitchens, I remember seeing some in various publications but I can't for the life of me find any images now that I'm looking for them.  But I did manage to find photos of the most BEAUTIFUL country kitchen with the same Tidaholm doors and that also have been custom sprayed.  Even though its the same cabinets as the kitchen above, its the complete opposite type of home, the white kitchen in the photos above is located in a 70's mid-town condo, the kitchen shown below is in an old century home in the rural town of Tweed, Ontario.  A testament to the versatility of a simple classic door style. 


This kitchen is the country home of Style at Home magazine editor Margot Austin, the photos are by Donna Griffith as seen in the April September 2007 issue of Style at Home.  I completley love everything about it - I wish I could just move in tomorrow, its perfection to me.   Apparantly I'm not the only one who covets this kitchen, its been reported that Martha Stewart hearts this kitchen too! 


At least five of my favorite things are in this one photo, white walls, windsor chairs, old wood floors, vintage bronze hardware, ,,,and furry four legged kids.

*Update:  see comment section for additional details from Margot herself.


Going back to what I mentioned above,  this represents what a successful Ikea kitchen design is all about - the cabinetry blends so well with the character of the home, its understated and doesn't distract from but rather highlights the real features of the room - that gorgeous island, the dramatic light fixture, the old flooring and antique finds.   This is how you do 'bespoke Ikea' and when everyone asks where you're kitchen is from, you can just say 'its Swedish, I had it custom built'.


Wednesday, June 9, 2010

Sweet Dreams: Lacoste Bedding


I came across such a fun collection of bedding today that I just had to share, Its the first time i've ever seen this line and I'm instantly crazy for it.  I had no intention on doing a post about bedding but I think you'll agree it has such a fresh, crisp feel to it it the timing seems so appropriate.

In order to understand my fascination with this bedding, I have to tell you that in the past 5 months I've outfitted from scratch at least 7 different beds for clients; for men, for women, for children, for guest rooms, from modern to traditional and from twin to King.  And I absolutely struggled through every minute of it because there was such a lack of selection and style, especially for gender neutral and clean modern styles.  There's no shortage of beautiful and stylish high-end bedding, selection galore if you've got thousands of dollars to spend dressing just one bed, but when working with a more modest budget of say less than $1000 per bed, or even $500 a bed, the options were seriously lacking on all accounts.  If I ever did find something I liked, it wasn't in stock or wasn't available in Canada and everything that was readily available (in my clients budget ranges) were all too,,,,, 'too'; too fussy, too frilly, too boring, too matchy, too dated, too traditional, too shiny, too plain, too busy, too colourful, too white, too creamy, too synthetic, too impractical,,,,,,,It was a frustrating experience to say the least.

So today when I was passing thru the bedding department at the Bay (a Canadian version of Macy's), my designer radar went bezerk when I approached this Lacoste bedding, I couldn't help but stop and drink it all in.  Of course you always find things like this when you're not looking for them - I'd never seen this product before so I was immediately drawn to it.  The colours were so fresh and clean looking and the collections looked modern and very fashion forward.  If only I had a bedroom in need of bedding now!!!!   The Bay had 3 different Lacoste bedding styles on display and I loved each one in its own way (they also had towels and robes) and I could envision each of them in a variety of settings.  There's actually many more collections that Lacoste makes but currently this is all that was available in this store.  I loved these clean graphic prints but also the fact they offerred a full collection of solids that you can mix and match along with a variety of accent pillows and cozy cable knit throws.  A designer could go crazy with so many possible options : )

I particularly think any of these would be perfect for a kids room, or a teens room either for boys or girls but I also couldn't help but envision these making a stylish statement in a breezy waterside cottage bedroom.   Personally, I was just happy to see some modern options in the bedding department!


This series is called the Catamarn, the pallette of colours is so refreshing.


Fashionable details like contrast piping, button closures, dual fabric pillows and double stitched seams in a mix of materials like cotton, cordroy, canvas and cableknit.


Bonus Find:  If you buy this bedding, I recommend you immediately head over to Homesense where I spotted these lamps just moments after leaving the Bay.  How perfect are these!

  
This series is called the Regate, its Nautical, preppy,,,summery fresh.  How striking would this be with a hit of lemon yellow or citrusy green.


This collection is called Othello and I love this modern geometric, its very dwell studio in feeling.


For those of you who have teenage fashionistas who are hooked on designer labels, they'll love the fact that each and every piece has the signature Lacoste logo on it.  


Now enough with these distractions, let's return to our regularly scheduled topics shall we.  As promised, I'm working on my next post which is all about how I custom paint Ikea kitchen cabinets...

Sweet dreams.